
 読者
読者マイクラサーバー公開した時にDDoS攻撃などの攻撃怖いからProxy通したいけどやり方がわからない…
 読者
読者BungeeCordやWaterfallってどうやって建てるの!!(怒)
 ゆるり
ゆるり実は、Agamesを使えば『BungeeCord』や『Waterfall』を簡単に立てることができます!
BungeeCord/Velocity/Waterfallとは
BungeeCord/Velocity/Waterfall(以下中継サーバー)とは、マイクラサーバー同士を連携できるソフトウェアです。
特徴
中継サーバーの特徴は以下3点です。
- 集中アクセスによる負荷の軽減
- セキュリティーの強化
- サーバーのバージョンが異なっていても接続ができる
集中アクセスによる負荷の軽減
マイクラサーバー単体だと一気にアクセスが来た場合処理しきれずラグや動作が重くなる場合があります。
中継サーバーを挟んでマイクラサーバーと接続した場合、中継サーバーが接続処理を行いマイクラサーバーへ接続を流すことができます。
また中継サーバーが必要な接続と不要な接続を判別しマイクラサーバーに送るため、マイクラサーバーの負荷が軽減します。
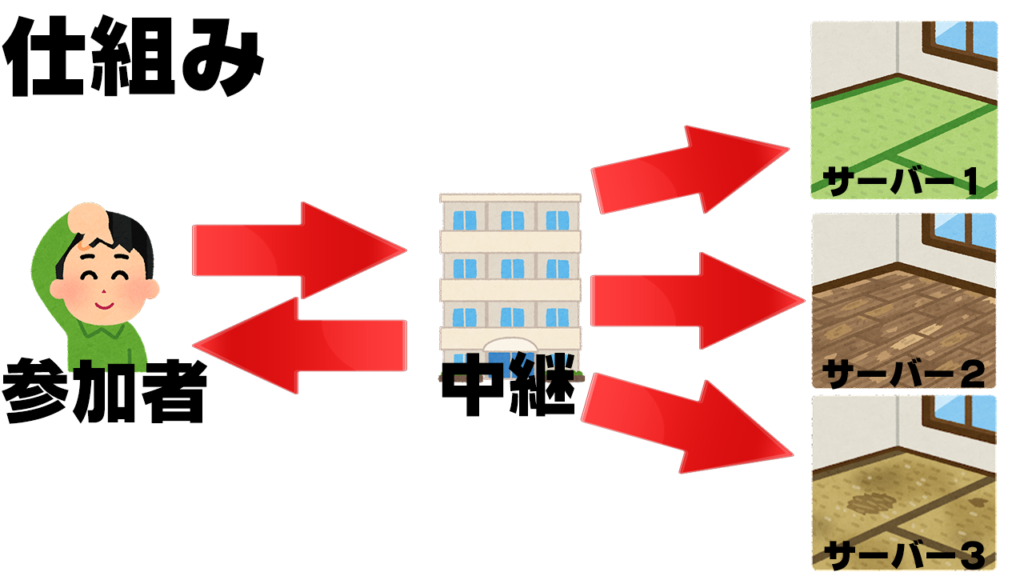
セキュリティーの強化
マイクラサーバーは特にIPとポートを開放するため、DDoS攻撃などの回線攻撃や負荷攻撃を受けることがとても多いです。
万が一受けた場合、マイクラサーバーが一時使用不能状態になる場合があります。
中継サーバーがある場合、攻撃は中継サーバーが受けることになりマイクラサーバー側への被害はほぼありません。
また、中継サーバーは複数立てることも可能なので、1つ中継サーバーが攻撃によりダウンしてももう1つの中継から参加するなどもできます。
これによりマイクラサーバーのIPやポートの公開が不要である点や攻撃に対するセキュリティーの強化ができます。
サーバーのバージョンが異なっていても接続ができる
中継サーバーはマイクラバージョン1.8~1.20.1(現最新)まで対応しているためどのバージョンでも接続することが可能です。
ただし、接続が可能なだけでそれに対応したマイクラサーバーを開放する必要があります。
メリット・デメリット
中継サーバーのメリット・デメリットは以下の通りです。
| メリット | デメリット |
|---|---|
| 複数のマイクラサーバーと連携することができる 負荷を分散することができる サーバーのバージョンと異なっていても接続できる セキュリティーの強化 | 高度な設定が必要(知識がないと難しい) |
中継サーバーは公開サーバーにはほぼ必須の実装になりますので覚えていきましょう!
中継サーバーの建て方
中継サーバーを立てるには以下の方法がおすすめです。
- Agamesを使う(3分でおすすめ)
- VPSを使う
- Windowsで建てる(自己責任)
中継サーバーをすぐ建てたい方は『Agames』がおすすめです!
Agamesについて詳しく知りたい方は以下の記事よりご覧ください。

Agamesを使う(おすすめ)
アカウント作成
サーバー購入
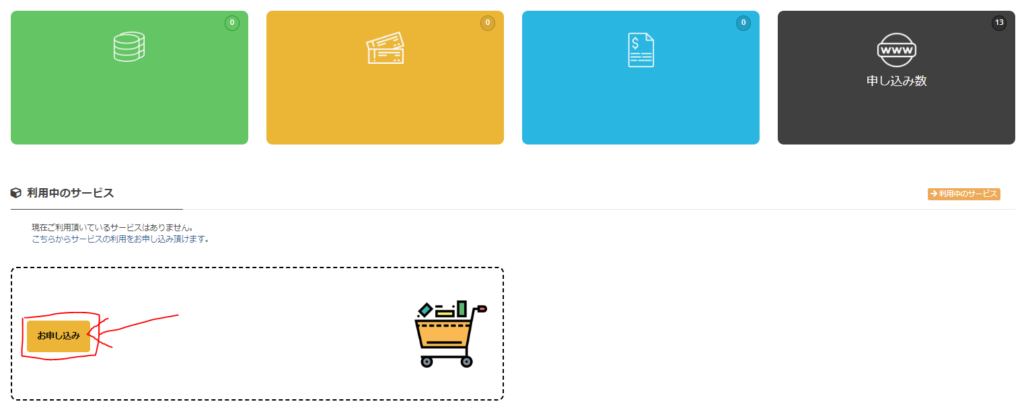
プラン選択画面を開く
左下にある『お申し込み』を選択しましょう。
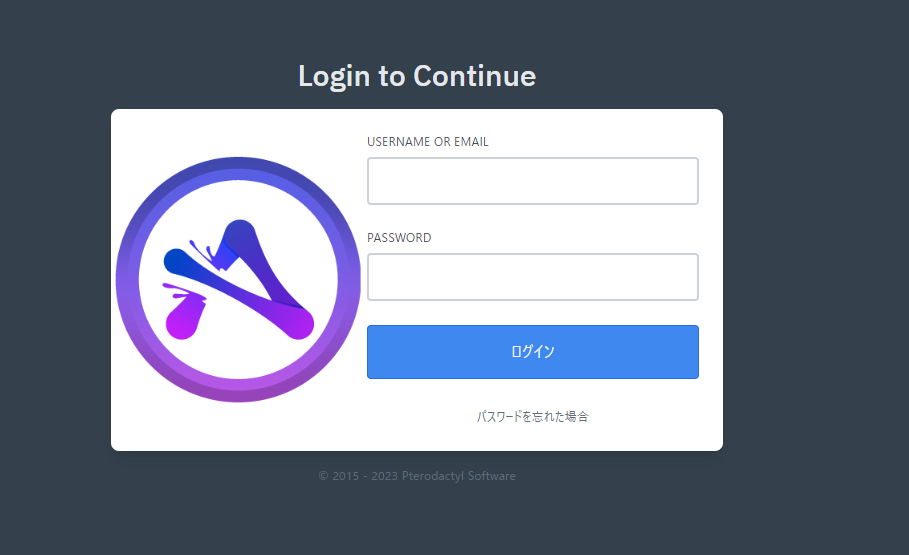
※この画面ではない場合Agamesのトップページからログインしてください。
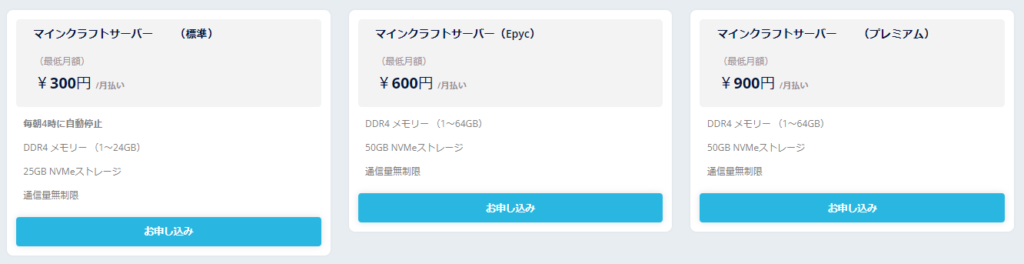
プランを選択する
マインクラフトサーバーを建てたいプランを選択しましょう。
プランの違いは以下の通りです(毎朝4時に自動停止したくない場合はEPYCかプレミアムを選択しましょう)
プランの違い
| 標準 | EPYC | プレミアム | |
|---|---|---|---|
| 価格 | 安い | 中間 | 高い |
| 性能 | 低い | 中間 | 高い |
| 自動終了(毎日朝4時) | あり | なし | なし |
| スケジュール (時間によって命令を実行) | 一部あり (時間でサーバー起動・終了ができない) | あり | あり |
| 初期CPU/容量 | 4コア/25GB | 8コア/50GB | 6コア/50GB |
お支払いプランを選択する
お支払いプランを選択しましょう。
12か月以上マイクラサーバーを使用する場合は12か月払いがおすすめです!(2か月分お得)
| 最低プラン(4GB) | 推奨プラン(8GB) | プレミアムプラン(16GB~) | |
|---|---|---|---|
| 標準 | 1,400円 | 2,400円 | 4,100円~ |
| EPYC | 2,300円 | 3,700円 | 5,600円~ |
| プレミアム | 2,700円 | 4,100円 | 6,500円~ |

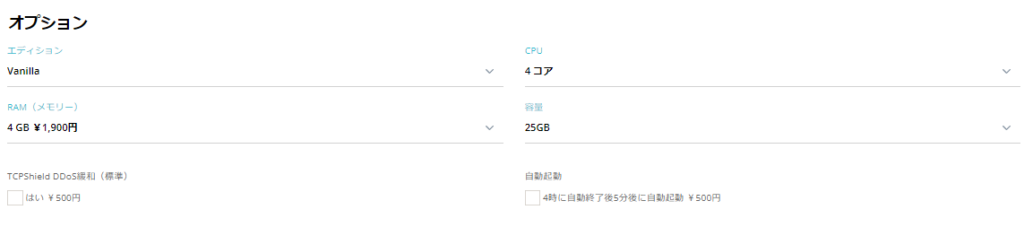
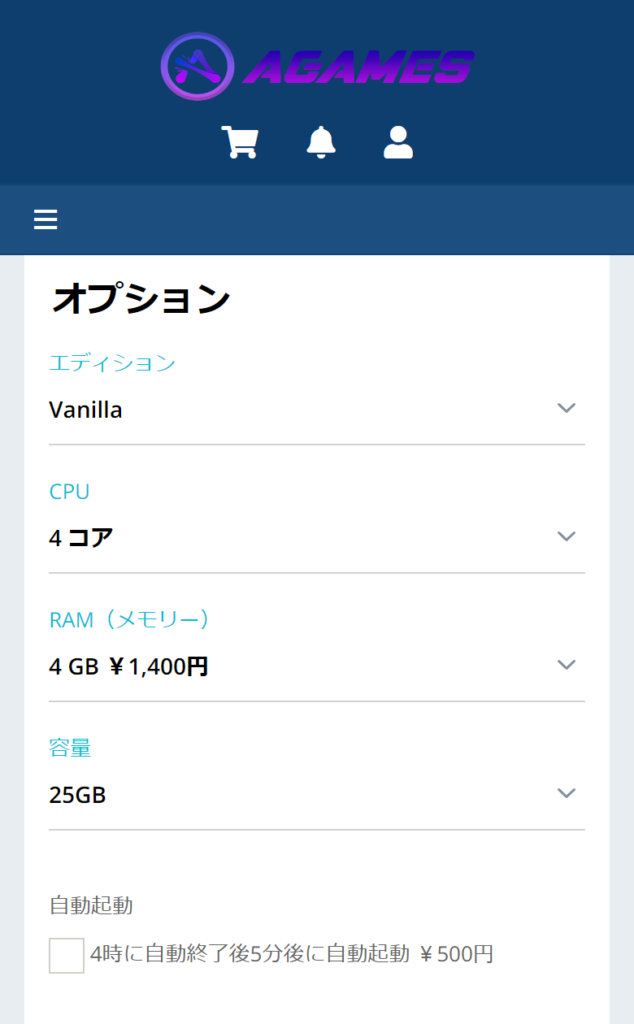
オプションを選択する
オプションを選択しましょう。選択が完了したら右側にある『続ける』を選択
おすすめ構成で購入すると快適にプレイできます。(エディションは使うものを選択)
おすすめ構成(1か月払い)
| プラン | CPU | メモリ | 容量 | 値段(月) | |
|---|---|---|---|---|---|
| 1~5人(バニラ/Paper) | 標準 | 4コア | 4GB | 25GB | 1,400円 |
| 6~10人(バニラ/Paper) | 標準 | 4コア | 4GB | 25GB | 1,400円 |
| 11人以上(バニラ/Paper) | 標準 | 4コア | 8GB | 25GB | 2,400円 |
| 統合版(Bedrock) | 標準 | 4コア | 2GB~4GB | 25GB | 800円~1,400円 |
| MOD鯖 | EPYC/プレミアム | 6~8コア | 8GB~16GB | 50GB | 3,700円~8,500円 |
| 24時間サーバー | EPYC | 8コア | 8GB | 50GB | 3,700円 |
| MCXboxBroadcast | EPYC | 8コア | 1GB~2GB | 50GB | 600円~1400円 |
| Waterfall/Velocity | EPYC | 8コア | 1GB~2GB | 50GB | 600円~1400円 |
※おすすめ構成は様々な要因で変動する場合があります。重い/ラグい場合はアップグレードを検討して下さい。


支払いを行う
注文に完了すると注文番号が出てくるので下にある『請求書番号』をクリックしましょう。
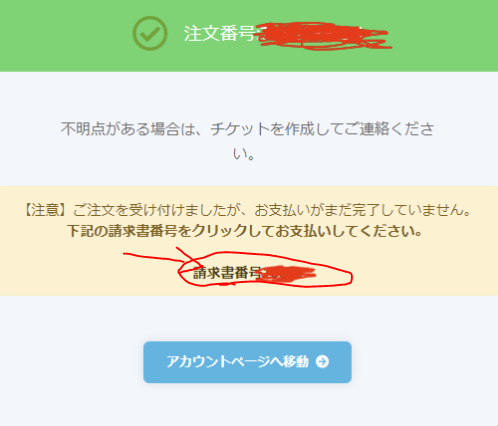
自分が指定したお支払方法に間違いがなければ右上にある『お支払い』から決済して下さい。

コントロールパネルへアクセス
サーバーを選択する
一番上にあるサーバーを選択する
コントロールパネルを確認する

その他詳しいコントロールパネルの使い方はこちらから
Agamesサーバー購入方法(スマホ版)
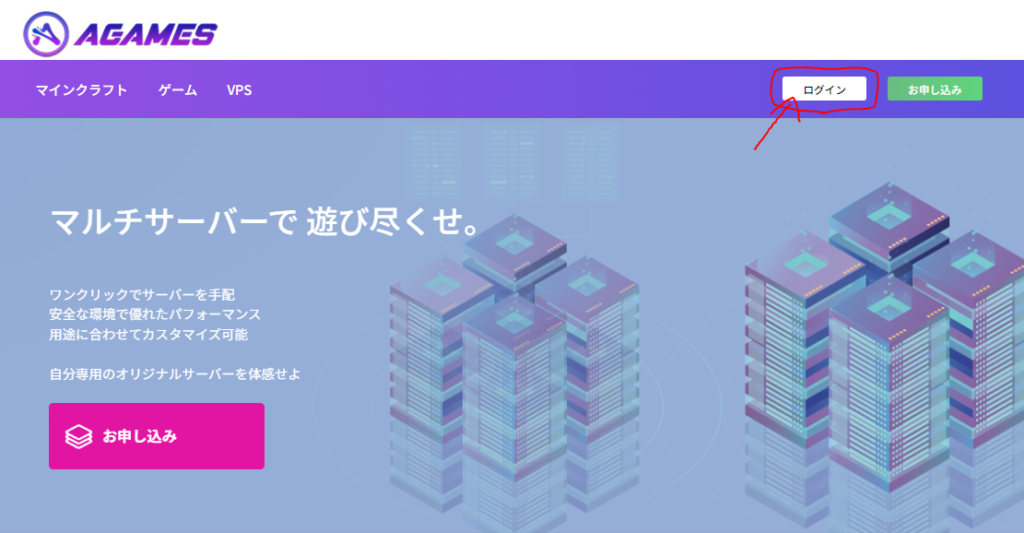
アカウントを作成
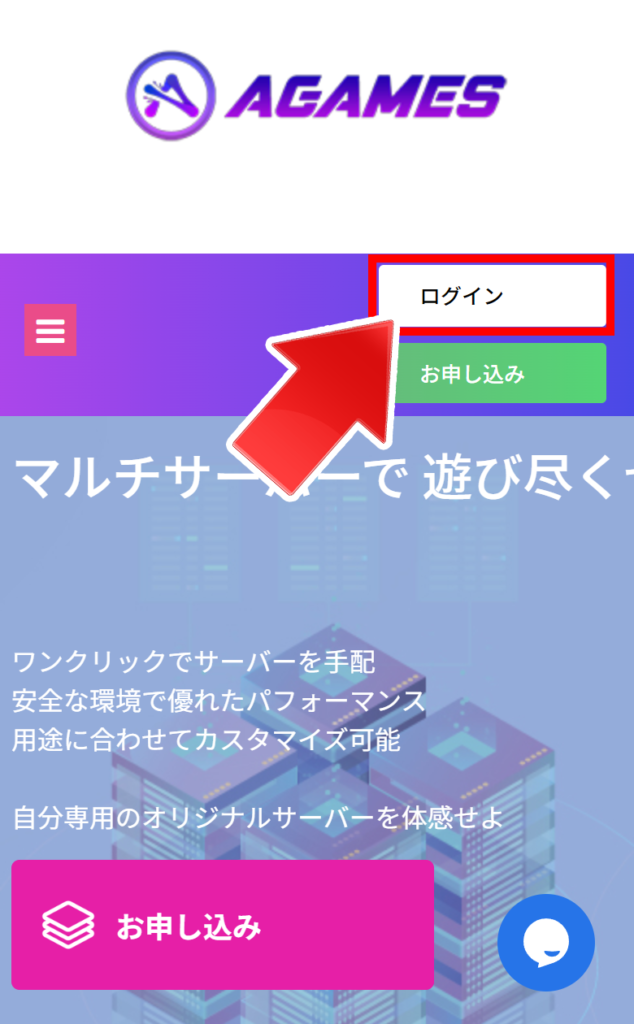
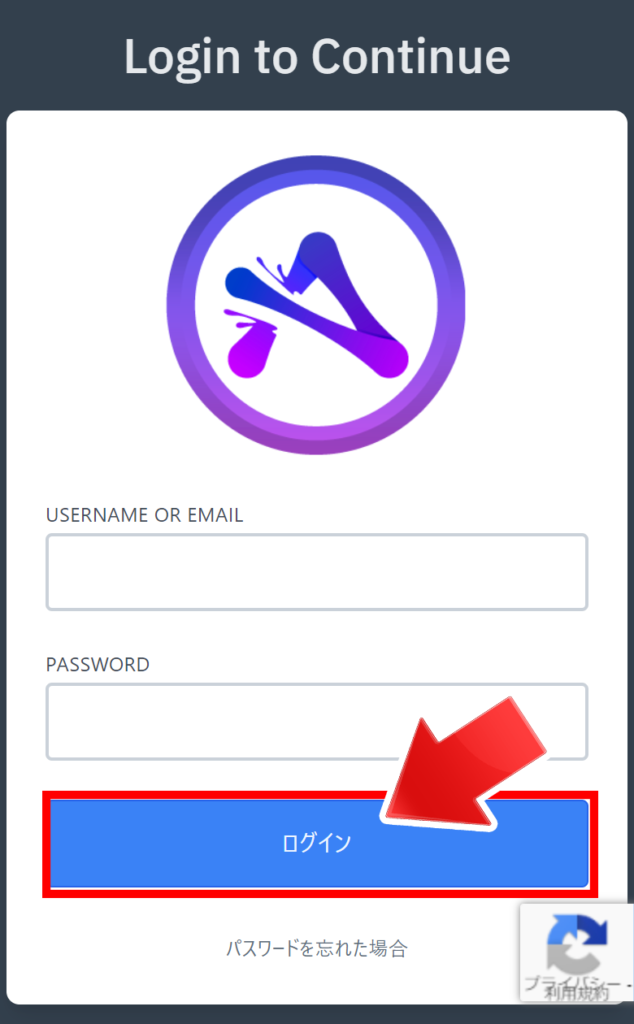
『ログイン』をタップする
右上にある『ログイン』をタップします。
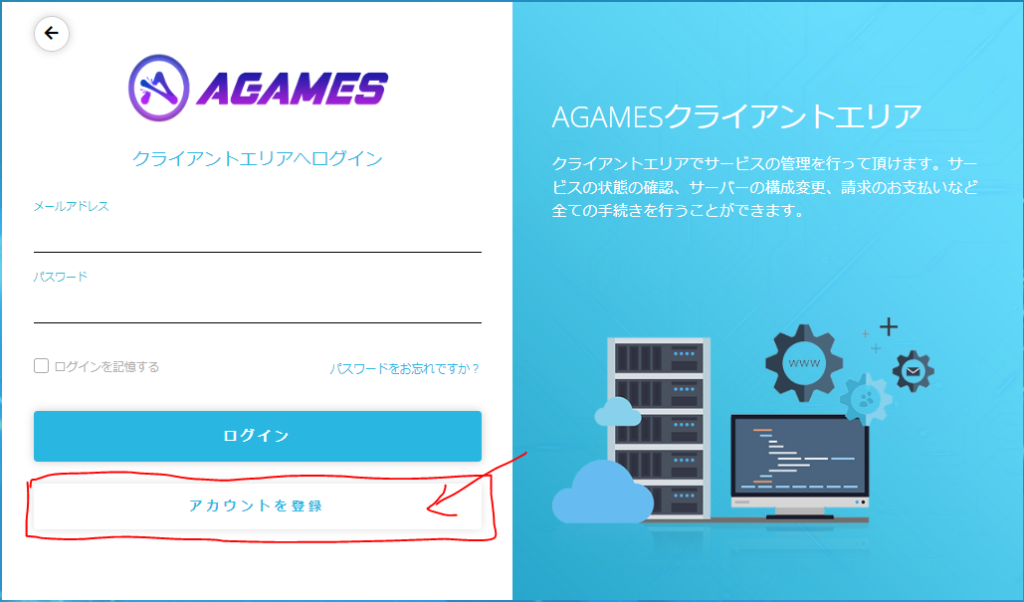
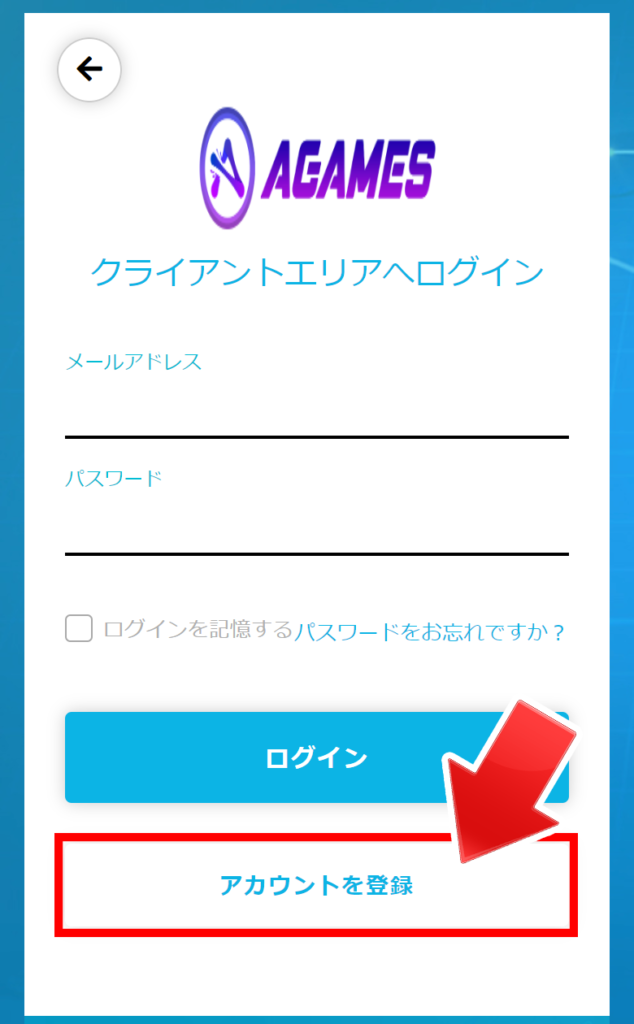
『アカウントを登録』をタップする
下側にある『アカウントを登録』をタップします。
※お申込みからでも行けますが手順が大変になるため、アカウントを作ってから行います。
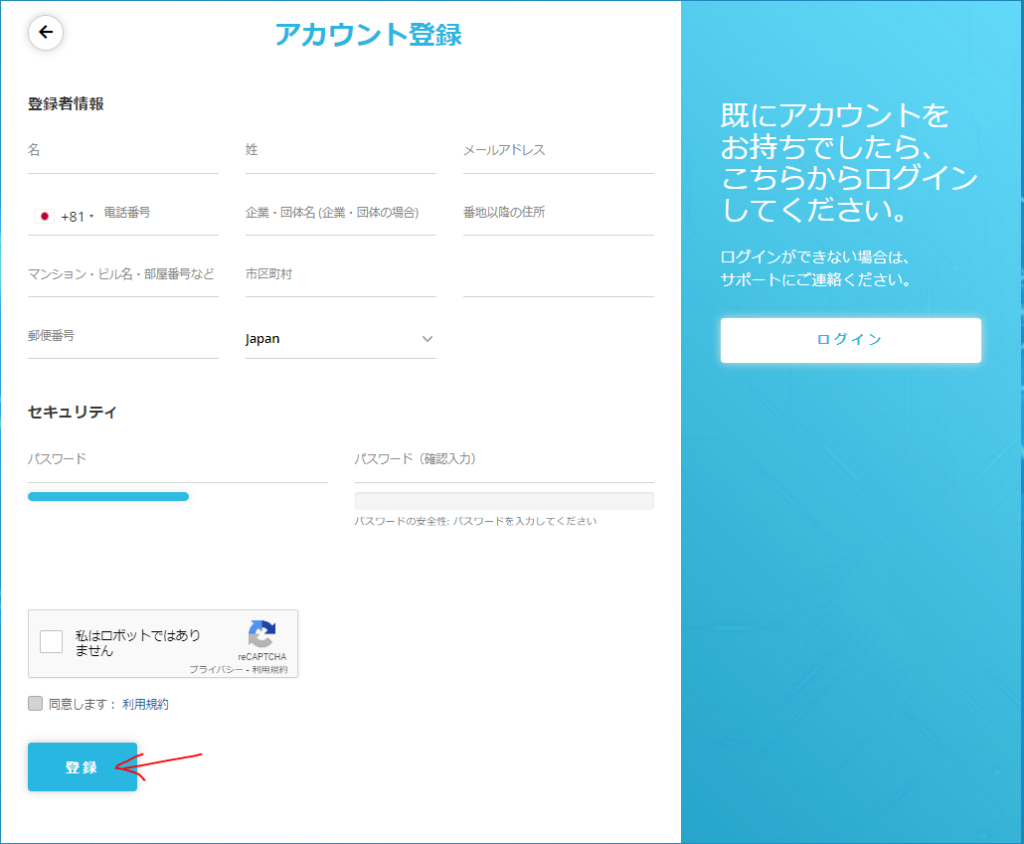
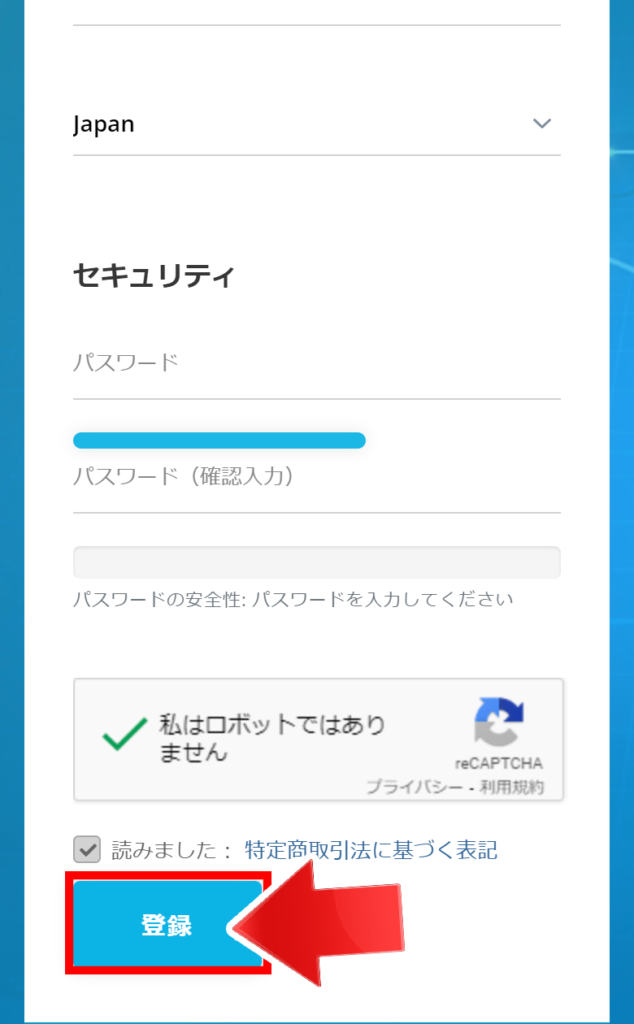
登録者情報を入力して『登録』をタップする
以下の情報を入力して『reCAPTHA(ロボットチェック)』・『特定商取引法に基づく表記』にチェックを入れ『登録』をタップします。
- 名前
- メールアドレス
- 電話番号
- 住所
- 郵便番号
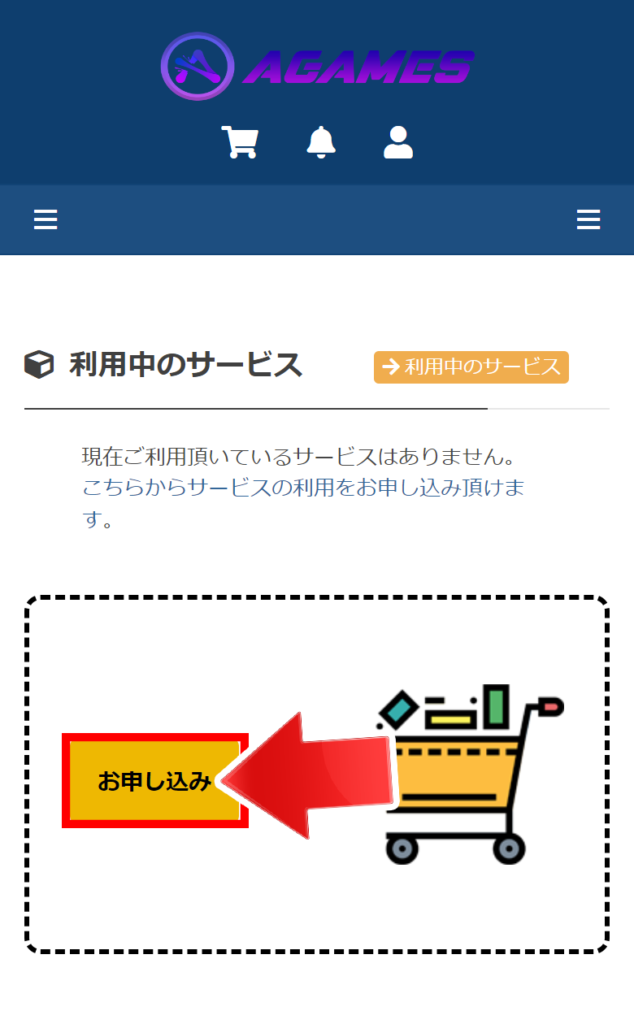
サーバーを購入
『お申し込み』をタップする
少し下にスライドし、真ん中あたりの『お申し込み』をタップします。
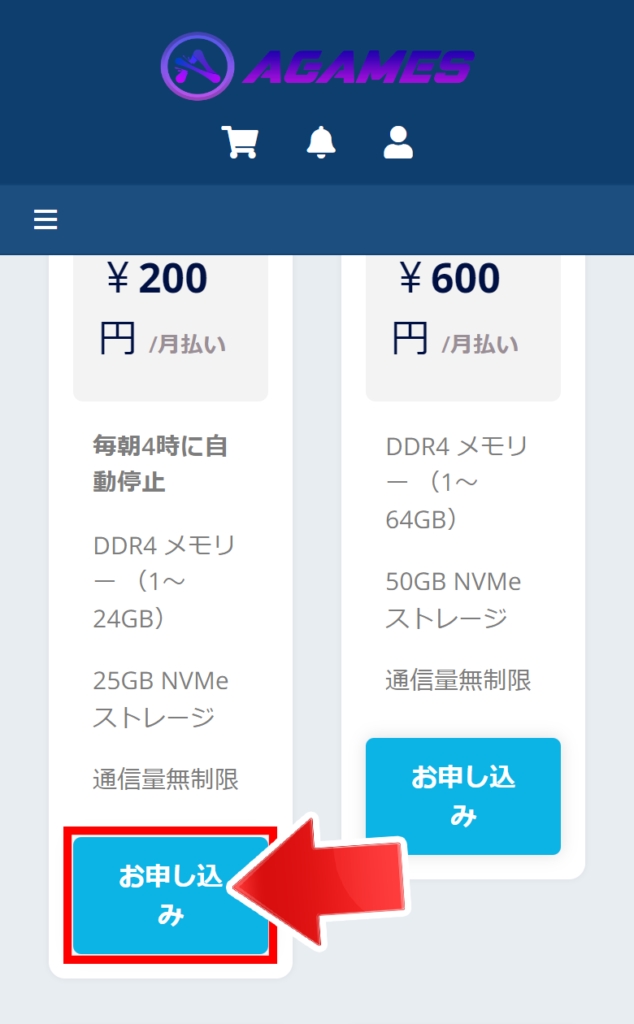
選びたいプランを選択し『お申し込み』をタップする
Agamesには4種類のプランがあり、プランの違いは以下の通りです。
プランを決めたら『お申し込み』をタップします。
プランの違い
| 標準 | EPYC | プレミアム | |
|---|---|---|---|
| 価格 | 安い | 中間 | 高い |
| 性能 | 低い | 中間 | 高い |
| 自動終了(毎日朝4時) | あり | なし | なし |
| スケジュール (時間によって命令を実行) | 一部あり (時間でサーバー起動・終了ができない) | あり | あり |
| 初期CPU/容量 | 4コア/25GB | 8コア/50GB | 6コア/50GB |
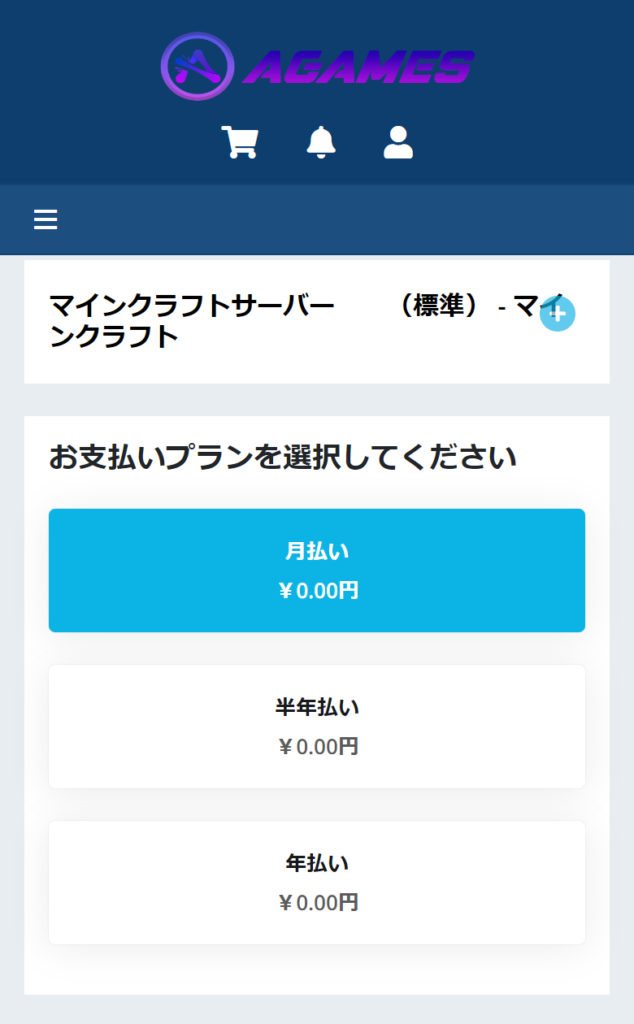
お支払いプラン・オプションを選択し『続ける』をタップする
『お支払いプラン』・『オプション』を選択したら、一番下にある『続ける』をタップします。
お支払いプラン
お支払いは3種類のプランがあり、違いは以下の通りです。
※12か月払いだと2か月分お得になります。
| 最低プラン(4GB) | 推奨プラン(8GB) | プレミアムプラン(16GB~) | |
|---|---|---|---|
| 標準 | 1,400円 | 2,400円 | 4,100円~ |
| EPYC | 2,300円 | 3,700円 | 5,600円~ |
| プレミアム | 2,700円 | 4,100円 | 6,500円~ |
オプション
『エディション』は自分が使う物を選択しましょう。
その他『CPU』・『RAM(メモリ)』・『容量』は以下を参考に設定してください。
おすすめ構成(1か月払い)
| プラン | CPU | メモリ | 容量 | 値段(月) | |
|---|---|---|---|---|---|
| 1~5人(バニラ/Paper) | 標準 | 4コア | 4GB | 25GB | 1,400円 |
| 6~10人(バニラ/Paper) | 標準 | 4コア | 4GB | 25GB | 1,400円 |
| 11人以上(バニラ/Paper) | 標準 | 4コア | 8GB | 25GB | 2,400円 |
| 統合版(Bedrock) | 標準 | 4コア | 2GB~4GB | 25GB | 800円~1,400円 |
| MOD鯖 | EPYC/プレミアム | 6~8コア | 8GB~16GB | 50GB | 3,700円~8,500円 |
| 24時間サーバー | EPYC | 8コア | 8GB | 50GB | 3,700円 |
| MCXboxBroadcast | EPYC | 8コア | 1GB~2GB | 50GB | 600円~1400円 |
| Waterfall/Velocity | EPYC | 8コア | 1GB~2GB | 50GB | 600円~1400円 |
※おすすめ構成は様々な要因で変動する場合があります。重い/ラグい場合はアップグレードを検討して下さい。
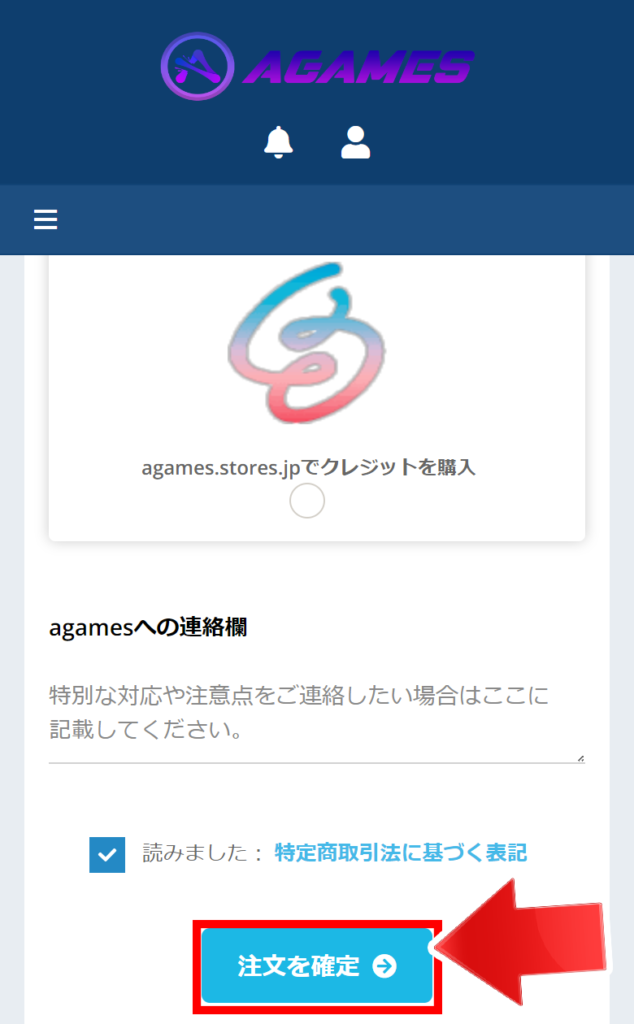
お支払方法を選択し『注文の確定』をタップする
Agamesでは以下の支払い方法に対応しています。
- クレジットカード
- Amazon Pay
- PayPal
- agames.stores.jp
『Agames.stores.jp』を通すと『コンビニ払い』・『キャリア決済』などにも対応できます。
詳しくはこちらをご覧ください。
支払方法を選択したら『読みました』にチェックを入れ『注文の確定』をタップします。
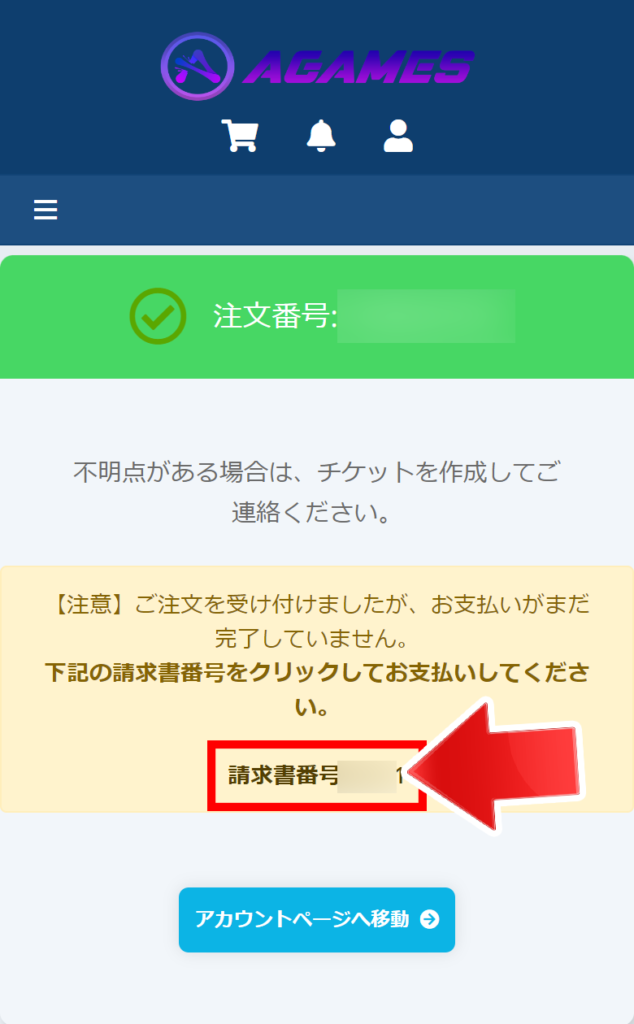
『請求書番号』をタップする
注文が出来たら『請求書番号』をタップしてお支払いを行います。(この地点では支払いは完了していません。)
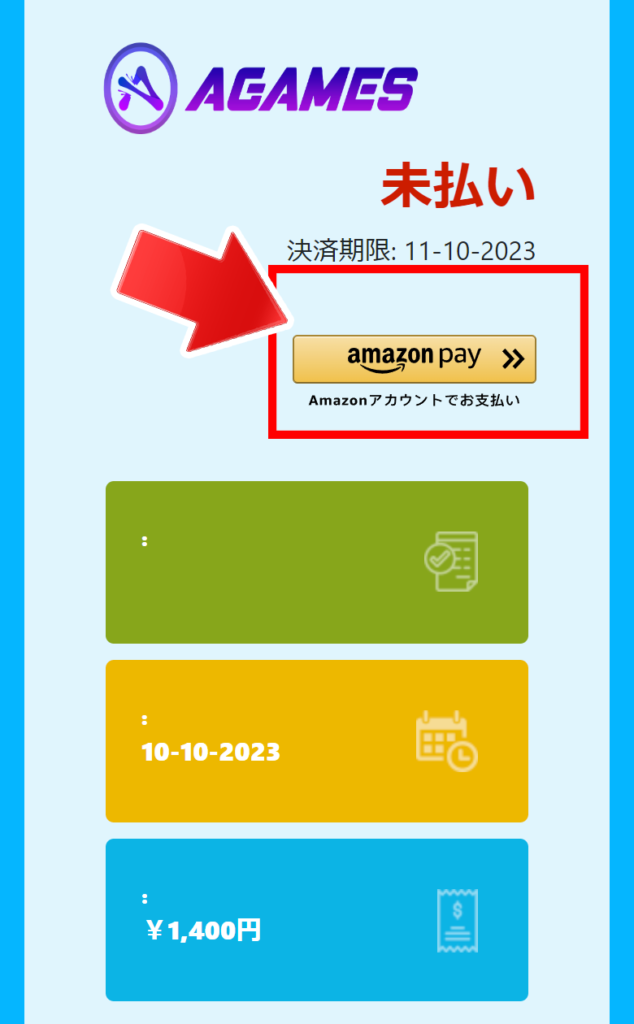
サーバーを支払う
選択した支払方法で支払う
右上に自分が選択した決済方法のマークがある為、タップして決済へ移動します。
Storesを選択した方はこちらを参考にチャージを行ってください。
コントロールパネルにアクセスする
メールアドレス・パスワードを入力し『ログイン』をタップ
『メールアドレス』・『パスワード』を入力して『ログイン』をタップします。
メールアドレスは Agamesで登録したメールアドレス を入力します。
パスワードは サーバー購入時にパスワード変更メール が来るのでリンクをタップしパスワードを選択してください。
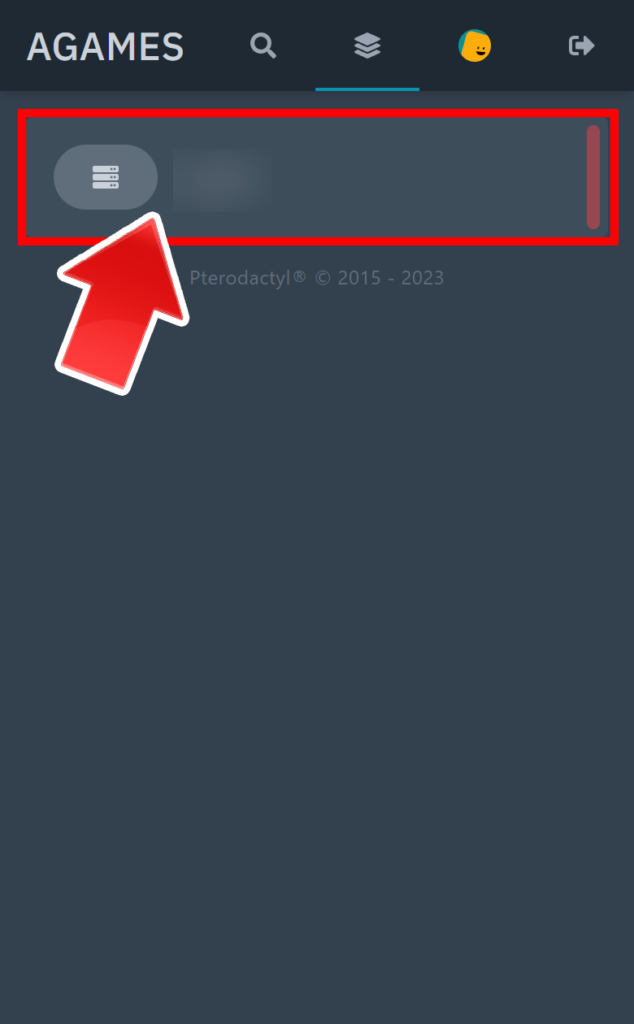
サーバーをタップ
一番上にある『サーバー』をタップします。
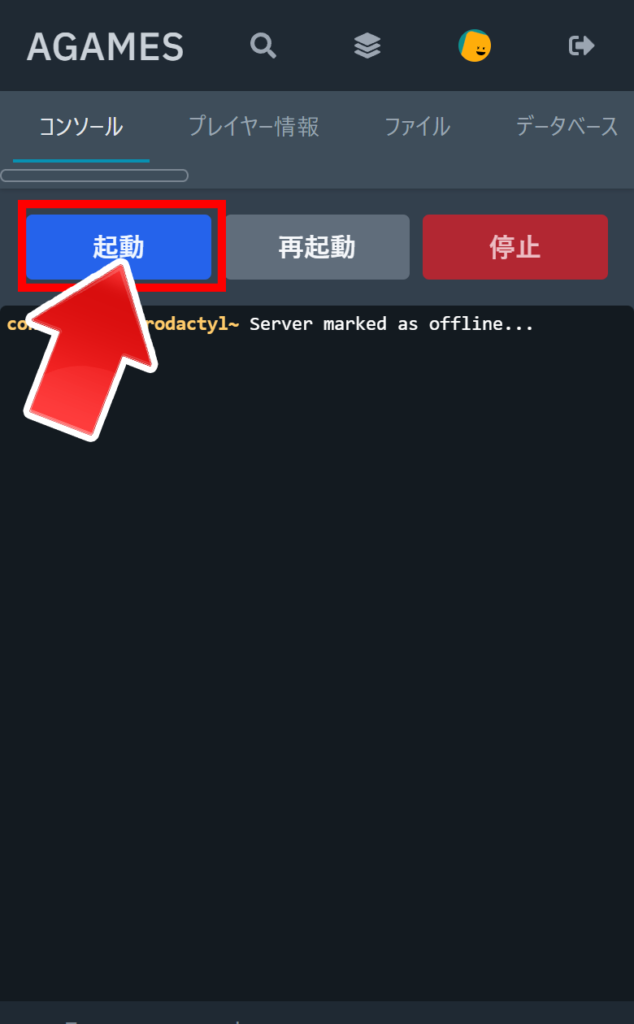
サーバーを起動をタップする
サーバーの『起動』をタップして『Accept Minecraft EULA』を I ACCEPT をタップしてマイクラサーバーを起動します。
コントロールパネルの使い方はこちらをご覧ください。
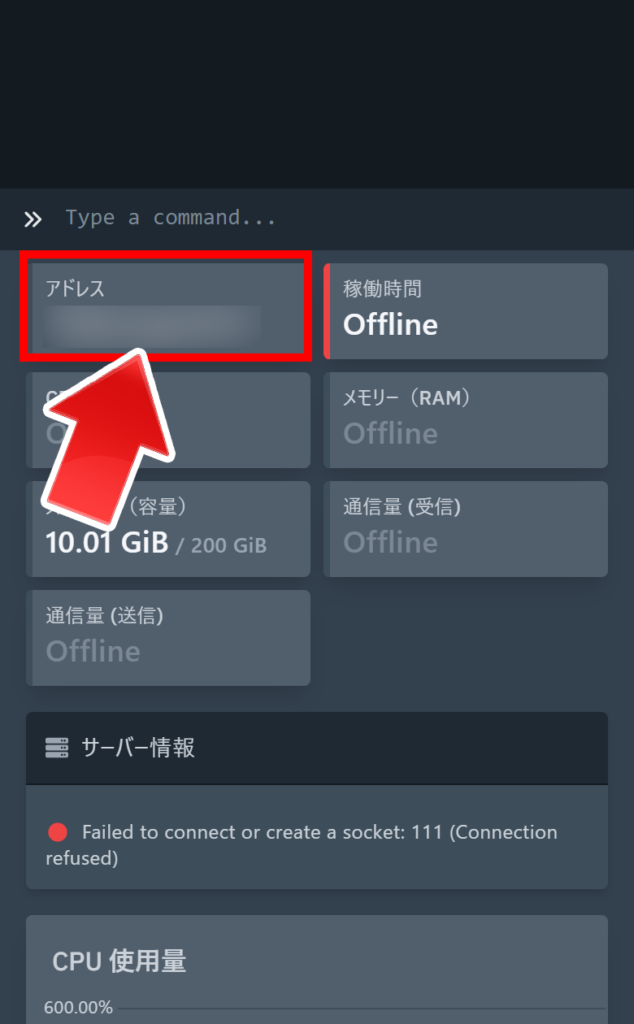
マイクラサーバーに参加する
下のほうにある『アドレス』をタップしてコピーします。
『Java版』と『統合版』では参加の方法が異なるためこちらをご覧ください。

VPSで建てる
VPSを使って建てる
準備
- メモリが2GB以上のWindows/VPS/レンタルサーバー
- マイクラサーバー
- Java8以上
中継サーバーは基本24時間で運用するためメモリは2GB以上推奨です
| ゲームサーバー | 特徴 |
|---|---|
 Xserver VPS(国内最安水準/コスパNo.1) | 性能コスパ No.1 Xserver VPS 月額830円から使える! Minecraftサーバーを5分で作れる! 決済方法が豊富 \ Agamesを詳しく知りたい? / |
 Conoha VPS(最大1か月無料) | 信頼度 No.1 Conoha VPS 最大1か月無料で使える! 信頼度がNo.1(筆者度) Minecraftサーバーを5分で作れる! \ Conoha VPS の購入はこちらから / |
 Indigo VPS(国内最安297円~) | 低価格 No.1 Indigo VPS 297円から使える!(国内最安) NTTの子会社が運営している \ Indigo VPS の購入はこちらから / |
ソフトウェアのダウンロード・起動
先ほど紹介した中継サーバー(BungeeCord/Velocity/Waterfall)のダウンロード先が異なるので自分が使いたいソフトウェアを選択してダウンロードしてください。
筆者のおすすめは、Waterfallです。
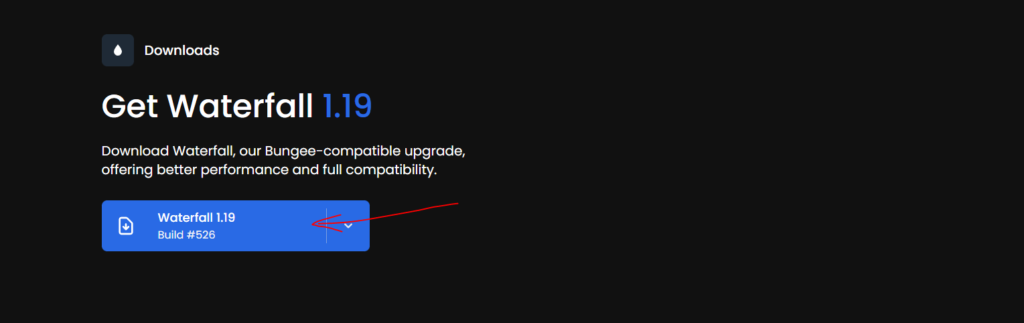
BungeeCord/Waterfallの場合
BungeeCord/Waterfallの場合(Ubuntu20.04を想定)
BungeeCordはそのまま右クリック→「リンクのコピー」で大丈夫です。
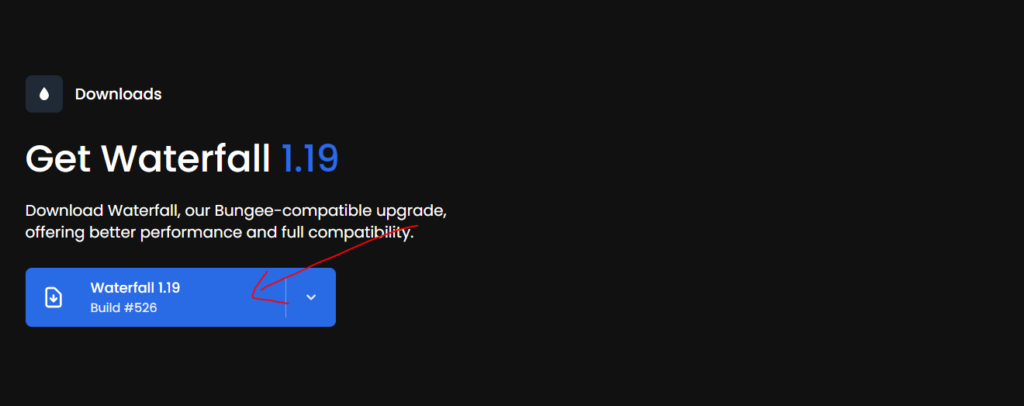
Waterfallは、コピーしてサイトにアクセスし青い場所で右クリック→「リンクのコピー」でできます。
以下のコマンドを入力(コピー)しファイルを生成しそのファイルに移動し、ファイルをダウンロードします。
==BungeeCord用==
mkdir /home/ubuntu/proxy && cd /home/ubuntu/proxy && wget https://ci.md-5.net/job/BungeeCord/lastSuccessfulBuild/artifact/bootstrap/target/BungeeCord.jarファイルのダウンロードが完了したら以下のコマンドを入力します。
java -jar BungeeCord.jar==Waterfall用==
mkdir /home/ubuntu/proxy && cd /home/ubuntu/proxy && wget waterfallでコピーしたリンク -O Waterfall.jarファイルのダウンロードが完了したら以下のコマンドを入力します。
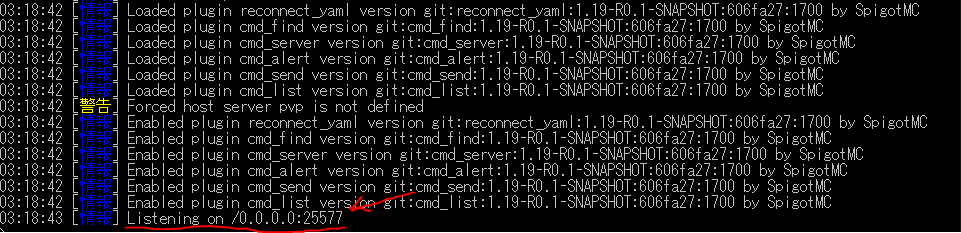
java -jar Waterfall.jar以下の表示が出たら一度「Ctrl+C」を押して閉じてください。(Listening on/0.0.0.0:25577まで出ると成功)

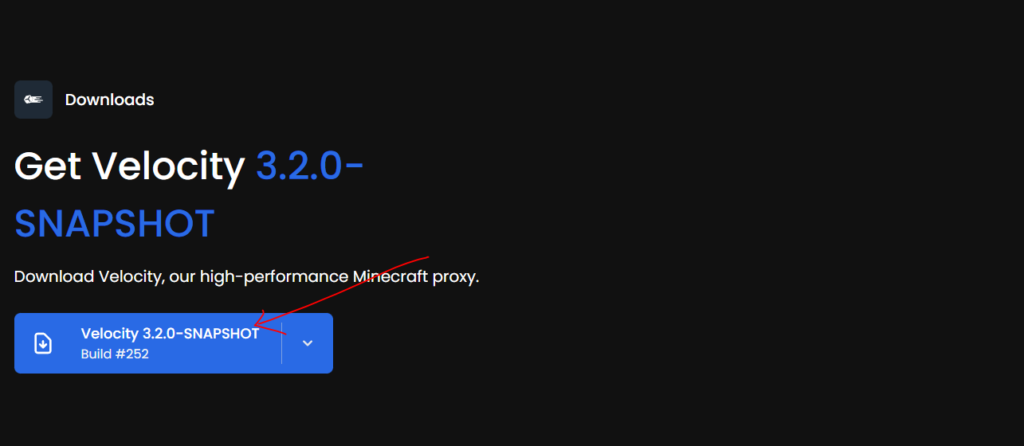
Velocityの場合
Velocityの場合(Ubuntu20.04を想定)
Waterfallは、コピーしてサイトにアクセスし青い場所で右クリック→「リンクのコピー」でできます。
以下のコマンドを入力(コピー)しファイルを生成しそのファイルに移動し、ファイルをダウンロードします。
mkdir /home/ubuntu/proxy && cd /home/ubuntu/proxy && wget velocityでコピーしたリンク -O velocity.jarファイルのダウンロードが完了したら以下のコマンドを入力します。
java -jar velocity.jar以下の表示が出たら一度「Ctrl+C」を押して閉じてください。(Listening on/0.0.0.0:25577まで出ると成功) 
Windowsで建てる
Windowsを使って建てる(自己責任)
BungeeCord/Waterfallの場合
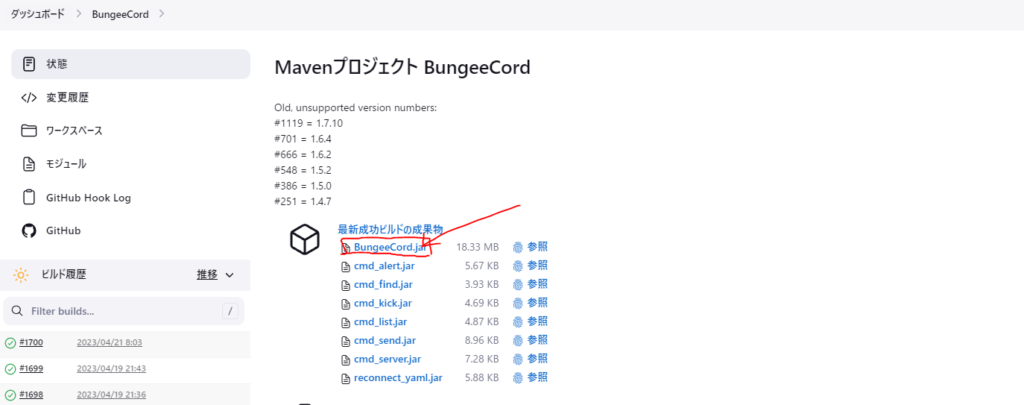
以下のサイトにアクセスして、画像の「BungeeCord.jar」か「Waterfall.jar」をクリックしてダウンロードしましょう。
「BungeeCord.jar」か「Waterfall???.jar」がダウンロード出来たら、どこかにフォルダーを作りその中に入れてください。
作成が完了したら、自分が選択したソフトウェアを以下から選択しダウンロードしてフォルダーに入れてください。
導入したら「run.bat」をダブルクリックし起動しましょう。
このファイルには以下のような事が書かれています。
個人的にメモリの256Mを自分のスペックで出せるメモリ容量に変えてください。(推奨は2GB以上です。)
(2GBを使用する場合は -Xms2G -Xmx2G または -Xms2048M -Xmx2048M )
※このコードはコピペしないでください!(ダウンロードしたものを使ってください。)※
==BungeeCord用==
@echo off //コンソールログを見やすくする
java -Xms256M -Xmx256M -jar BungeeCord.jar nogui //javaで最小/最大メモリを256MBで設定しBungeeCord.jarをGUIなし(コンソール)で起動する処理
pause //エラーが起きた場合に自動で終了しないようにする処理(キーを押さない限り消えない)

==Waterfall用==
@echo off
set KEYWORD=waterfall //検索キーワード
set FILE_NAME= //ファイル名

for /f "delims=" %%a in ('dir /b /a-d %KEYWORD%*.jar') do (
    set FILE_NAME=%%a //起動した場所の一覧を取得しキーワードが含む物+.jar が最後に付く物をチェックする処理
)

if not "%FILE_NAME%"=="" (
    java -Xms256M -Xmx256M -jar %FILE_NAME% nogui //上の処理でファイルが見つかれば起動する処理
)
pause起動時に以下の警告が出たら「プライベートネットワーク」にチェックを入れ「アクセスを許可する」を選択

以下の表示が出たら一度バツを押して閉じてください。(Listening on/0.0.0.0:25577まで出ると成功)
Velocityの場合
以下のサイトにアクセスして、画像の「Velocity」をクリックしてダウンロードしましょう。
「Velocity???.jar」がダウンロード出来たら、どこかにフォルダーを作りその中に入れてください。
作成が完了したら、自分が選択したソフトウェアを以下から選択しダウンロードしてフォルダーに入れてください。
以下の表示が出たら一度バツを押して閉じてください。(Doneまで出ると成功)
中継サーバーの設定
BungeeCord/Waterfallの場合
BungeeCordやWaterfallを起動すると『Config.yml』が生成されるのでファイルを開いてください。
その中の以下3つの設定を変更します。
Listenerの設定
listeners:
- query_port: 25577
  motd: '&1Another Bungee server'
  tab_list: GLOBAL_PING
  query_enabled: false
  proxy_protocol: false
  forced_hosts:
    pvp.md-5.net: pvp
  ping_passthrough: false
  priorities:
  - lobby
  bind_local_address: true
  host: 0.0.0.0:25577
  max_players: 1
  tab_size: 60
force_default_server: false| 名前 | 説明 |
|---|---|
| forced_hosts: | Aドメインの割り振りの際にドメインが一致したらそのサーバーに飛ばす設定です。(数字IPの場合不要) |
| priorities: | プレイヤーが初めて参加した際に、どのサーバーから接続するかを設定できます。(順番) |
| tab_list: | [Tabキー]を押した際にプレイヤーの何を表示するかです。基本そのままで大丈夫です。 |
| host: | 中継サーバーのアドレスです。IP:Portで設定する。 (このIPで中継サーバーに接続できます) |
| restricted: | コマンドで移動する際(./serverなど)に権限が必要かどうかの設定(false:誰でも移動OK/true:権限あり) |
Serversの設定
servers: # 例です。
  lobby:
    motd: '&1Just another BungeeCord - Forced Host'
    address: localhost:25565
    restricted: false
  survival:
    motd: '&1Just another BungeeCord - Forced Host'
    address: localhost:25567
    restricted: false
  pvp:
    motd: '&1Just another BungeeCord - Forced Host'
    address: localhost:25560
restricted: false| 名前 | 説明 |
|---|---|
| servers: | サーバーの設定は以下からできるよ。という区切りです。(書き換えたらダメです) |
| lobby: | サーバー管理名を”英語”で決めれます。。基本lobbyは書き換えないでください |
| motd: | マルチプレイ画面に表示される文字を設定できます。(ただほぼ使われないので変更しなくて良い) |
| address: | マイクラサーバー(Spigot/Paperなど)のアドレスです。IP:Portで設定する。 |
| restricted: | コマンドで移動する際(./serverなど)に権限が必要かどうかの設定(false:誰でも移動OK/true:権限あり) |
ip_forwardの設定
「ip_forward」とは、プレイヤーのIP・プレイヤー名でUUIDを生成してマイクラサーバーに飛ばすかどうかの設定です。
原則:true にしてください。(trueにしない場合は、プレイヤーのBANの処理や名前が変更された場合に問題が発生します)
ip_forward: true以上3つの設定が完了したら保存して中継サーバーを再起動し接続ができれば完了です。
Velocityの場合
「Velocity」を起動すると「velocity.toml」が生成されるのでファイルを開いてください。
その中の以下4つの設定を変更します。
bindの設定
「bind」とは、中継サーバーのアドレスです。IP:Portで設定する。 (このIPで中継サーバーに接続できます)
# What port should the proxy be bound to? By default, we'll bind to all addresses on port 25577.
bind = "0.0.0.0:25577"
force-key-authentication の設定
「force-key-authentication」とは、1.19で追加された機能でプレイヤーの鍵認証したユーザーのみ入れるかの設定です。
バージョンによって接続・できないが発生しやすいのは falseにしましょう。
# Should the proxy enforce the new public key security standard? By default, this is on.
force-key-authentication = false
player-info-forwarding-mode の設定
「player-info-forwarding-mode」とは、プレイヤーのIPアドレスやその他データをマイクラサーバーに転送するかどうかの設定です。
全サーバーバージョンが1.13未満だったら「legacy」それ以上+Paperの場合は「modern」に設定しましょう。
※この設定は、マイクラサーバー側に直接参加できる仕様を無効化する為にあるものです。(特定の条件下で直接接続してOP乗っ取りなど可能になります。)
player-info-forwarding-mode が 「modern」の場合
マイクラサーバー側のpaper.yml の「velocity-support: ‘コード’」を入力してください。
コードは「forwarding.secret」を開くと書いてあります。
# Should we forward IP addresses and other data to backend servers?
# Available options:
# - "none":        No forwarding will be done. All players will appear to be connecting
#                  from the proxy and will have offline-mode UUIDs.
# - "legacy":      Forward player IPs and UUIDs in a BungeeCord-compatible format. Use this
#                  if you run servers using Minecraft 1.12 or lower.
# - "bungeeguard": Forward player IPs and UUIDs in a format supported by the BungeeGuard
#                  plugin. Use this if you run servers using Minecraft 1.12 or lower, and are
#                  unable to implement network level firewalling (on a shared host).
# - "modern":      Forward player IPs and UUIDs as part of the login process using
#                  Velocity's native forwarding. Only applicable for Minecraft 1.13 or higher.
player-info-forwarding-mode = "legacy"
servers の設定
[servers]とは、マイクラサーバーの転送設定です。ここに設定されているサーバーに移動することができます。
[servers]
# Configure your servers here. Each key represents the server's name, and the value
# represents the IP address of the server to connect to.
lobby = "127.0.0.1:30066"
factions = "127.0.0.1:30067"
minigames = "127.0.0.1:30068"
以上4つの設定が完了したら保存して中継サーバーを再起動し接続ができれば完了です。
マイクラサーバー側の設定
マイクラサーバー側の設定変更は以下2点です。
online-mode の設定
server.properties の中に『online-mode』という設定があります。
「online-mode」とは、参加してきたプレイヤーをMinecraft側がチェックして問題がなければ参加できるシステムです。
原則、中継サーバーがチェックを行うため不要になります。(2重チェックはできません。)
※通常は trueでいいのですが、中継サーバーを経由する場合は falseにする必要があります。
online-mode=falsebungeecord の設定
spigot.yml の中に『bungeecord』という設定があります。
「bungeecord」とは、中継サーバーから来た参加者のプレイヤーIPをマイクラサーバー側にも転送する機能です。
※通常は falseでいいのですが、中継サーバーを経由する場合は trueにする必要があります。
bungeecord: trueよくある質問
BungeeGuardの設定はどうすればいいですか?
以下の方法で設定できます
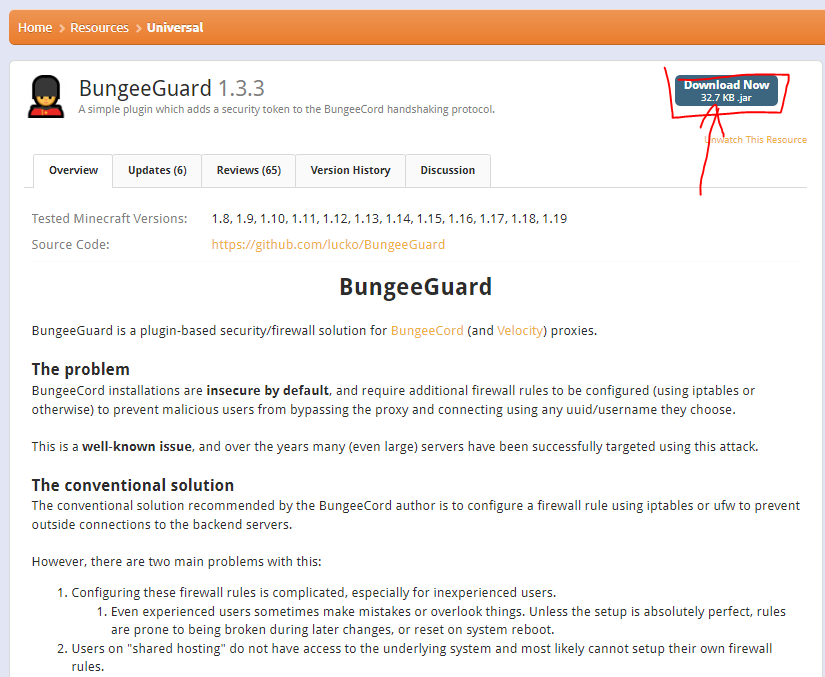
下記のサイトにアクセスし、プラグインをダウンロードします。
ダウンロードが完了したら、マイクラサーバー側と中継サーバーにプラグインを導入します。
「plugins」というフォルダーがあるのでそこに入れましょう。
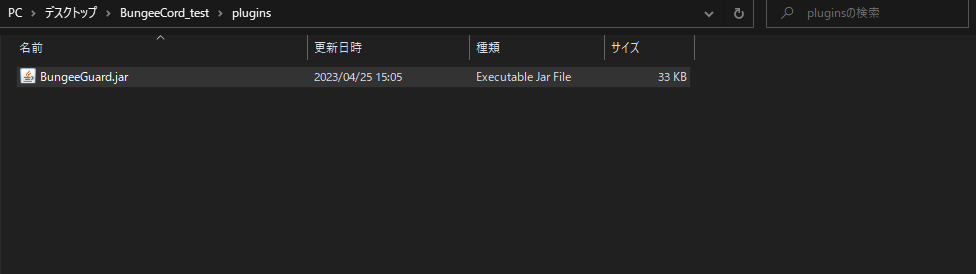
中継サーバーを起動すると「plugins」の中に「BungeeGuard」というファイルができるのでそのファイルにアクセスし「token.yml」を開き token: の先を全てコピーしましょう。(画像の赤い場所)


マイクラサーバーを起動すると「plugins」の中に「BungeeGuard」というファイルができるのでそのファイルにアクセスし「config.yml」を開き以下のように設定して保存しましょう。
# BungeeGuard Configuration

# Allowed authentication tokens.
allowed-tokens:
- "TokenIDを入れる"中継サーバー/マイクラサーバー側の設定が終わったら再度マイクラサーバーを再起動させて接続できるかチェックしましょう。
マイクラサーバー側をonline-modeをfalseにする場合危険性ないの?
中継サーバーなどでマイクラサーバーのonline-modeをfalseにした場合以下の問題が起きるため以下の対策を取ってください。
- BungeeGuardやVelocityのSecretキーで鍵が一致しているか確認する(おすすめ)
- マイクラサーバー側のポートを開放しない。
- 特定のIP以外の通信を遮断する。
BungeeGuardやVelocityのSecretキーで鍵が一致しているか確認する(おすすめ)
中継サーバーのプラグインでBungeeGuardというものがありますが、これを使うと中継サーバーとマイクラサーバーの鍵が互いにあっているかをチェックしてくれます。
これをすることにより、鍵があっていない場合は接続を拒否することができ悪意のある中継サーバーが置かれても接続をできなくします。
マイクラサーバー側のポートを開放しない
中継サーバーとマイクラサーバーを一緒の場所に置く場合、ポート開放を中継サーバーのみにしておけばこの問題は起きません。(中継サーバー ⇔ 中継サーバー という接続は仕様的にできません。)
ただし、VPSやレンタルサーバーに中継サーバーを配置して、マイクラサーバーを中継サーバー以外に配置する場合はこの方法は使えません。
特定のIP以外の通信を遮断する
マイクラサーバーをVPS(Linux)などで建てている場合は、中継サーバーのIPだけをマイクラサーバーが置いてあるサーバーのファイアウォールにホワイトリスト登録してそれ以外のIPは遮断すると、この問題は起きません。
プレイヤーも参加できなくなるんじゃないの?という意見もあるかとは思いますが、中継サーバーがマイクラサーバーにプレイヤーのデータ(IP/プレイヤー情報)を送っているだけなので、中継サーバーIPのホワイトリスト登録するだけでOKです。
ただし、ゲームサーバーのみ提供しているサービスや中継サーバー自体のパソコンの権限がないとこの方法は使えません。
まとめ
いかがだったでしょうか。
やり方自体は難しくないので是非お試しください!
ではでは~
\Discordを作成しました。何かお困りごとがあればこちらから/
コメント